
Designing Drills That Work at the Youth Recreational Soccer Level
Most recreational coaches don’t struggle because they “don’t know soccer.” They struggle because they have limited time, limited help, and a wide range of player abilities—which means even a well-intentioned drill can fall apart quickly.
You don’t need to memorize 100 drills. You need two formats and a decision-making process.
This article shows you how to turn “my team can’t pass under pressure” into a 15-minute drill that actually works—based on what you saw in the last game.
This is one part of three that cover different aspects of practice design and execution. This article covers how to design drills. The other two articles cover Practice Structure and Design, and What to Teach
What Makes a Drill “Good”
A good drill does four things:
- Targets a real need
Sometimes that need is technical (passing, first touch). Other times it’s spacing, decision-making, confidence, energy level, or resetting the team after a rough game. - Solves the problem without constant reminders
If players start adjusting on their own—without you repeating the same instruction every 20 seconds—the drill is doing its job. - Keeps players engaged
Minimal standing around. Minimal eye-rolling. Minimal chaos. - Ends at the right time
A drill that runs too long stops teaching—even if it started well.
The Two Main Drill Formats
Roughly 80% of what recreational teams need to learn outside of free play and scrimmage can be taught using just two formats:
- Small-sided games
- Pattern choreography
Most drills you find online are simply variations of these two formats. Once you understand the categories, the thousands of drills stop feeling overwhelming—because you can see them as the same structures with different constraints.
The key shift is this: Stop thinking in terms of a million drills. Start thinking in terms of two formats you can tweak.
Small-Sided Games (SSG) (#v#)
Small-sided games are live competitions on a reduced field. Their purpose is to recreate specific game situations repeatedly so players practice skills and decisions under realistic pressure.
You set the conditions. The players make the decisions.
At the smallest level this is 1v1, and it scales up from there. Field size matters, but the guiding rule is simple: Enough room to engage— not so much room that players spend more time running than playing.
What You Can Adjust in a Small Sided Game
- Numbers: balanced (1v1, 2v2, 3v3, 4v4) or imbalanced (2v1, 3v1, 5v2)
- Goalkeepers: with or without
- Goals: PUGGs, full goals, four-goal setups, mixed goals
- How play starts: coach serve, goalkeeper distribution, dropped ball, race to the ball, one team serves to another
- Constraints: touch limits, no dribbling, mandatory backward pass, everyone touches before scoring

For U12 and under, keep constraints simple. “Everyone must touch” is hard to track and enforce. Touch limits are easier and often create the same learning outcome.
You can mix and match endlessly—so how do you choose? Ask one design question: “What setup and constraints force the behavior we need to work on?” Also: don’t overthink it. Most small-sided games already create learning opportunities. A thoughtful setup simply makes those moments unavoidable.
Example: Turning Game Problems Into a Small Sided Game
What you saw in the game:
- Misjudged air balls
- Little passing
- Players standing next to defenders instead of getting open
- Dribblers losing the ball trying to beat multiple opponents
What you want to teach:
- Judging air balls
- Off-ball movement
- Passing to open teammates
Drill: 2v1+GK or 3v1+GK
- Goalkeeper drop-kicks to attackers
- One defender sprints out late
- Once the ball is controlled in the air, no dribbling allowed
This forces:
- Judging the ball in the air
- First touch under pressure
- Off-ball movement to get open
- Passing decisions (the forward option is often cut off)
- Defensive decision-making while outnumbered (pressure, angles, delaying)
Coach selectively. Let play flow. Correct choices, not imperfect execution.
General Guide: What Different Small Sided Game Types Teach
- Even numbers, fewer players (1v1, 2v2):
Ball handling; 1v1 attacking and defending - Even numbers, more players (3v3, 4v4):
Small combinations, give-and-go, quicker passing, pressure, creativity - Uneven numbers (2v1, 3v1, 5v2):
Offense vs defense; off-ball movement under pressure; decision-making; for defenders—angles, containment, defending while outnumbered - How the ball starts:
Choose based on the learning goal (race, advantage/disadvantage, controlled entry) - Constraints:
Use one or two to stop unwanted behavior or force the movement you want - Small goals:
Fast transitions and repetition - Large goals:
Finishing and goalkeeper involvement - Four goals:
Encourages width and field awareness - One big + two small goals:
Offense attacks the big goal; defense clears wide
How to Coach During Small-Sided Games
- Keep live commentary limited to a few key themes
- Don’t correct everything—too much feedback dilutes learning
- Stop play only for high-value teaching moments
- Use consistent vocabulary
If you regularly say “support from behind,” players learn exactly what that means in action.
Pattern Choreography
The purpose of pattern choreography is motor memory. Pattern choreography is a coach-directed sequence players repeat without defenders and without decision-making. It recreates movements you want to see later in games. Typically involves one to three players. More than that reduces repetition and clarity.
The goal is not that the exact pattern appears in a game. The goal is repeated physical execution of:
- Wall passes
- Through passes
- Back passes
- Pass-and-move habits
- Off-ball positioning constraints
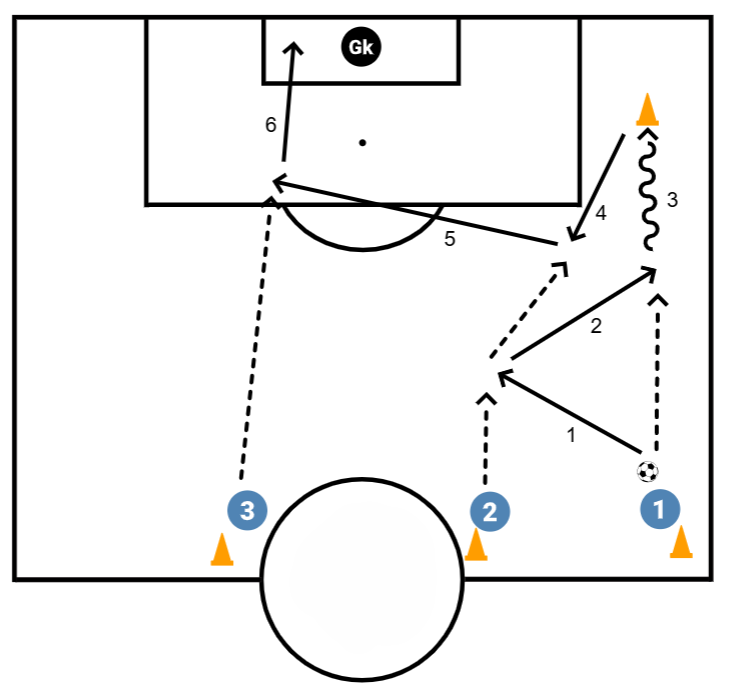
Bodies learn first. Understanding follows.
Example: Teaching Width and Support
What you saw: Everything forced forward. No sideways or backward support.
What you want: Width, support behind the ball, crossing habits.
Drill: Three attackers run a cone-based passing pattern that includes:
- A back pass
- A side pass
- Staying wide
- A cross
- A shot on goal (with a goalkeeper)
Use short cues:
- “Support behind.”
- “Play it where they’re running.”
- “Cross away from the keeper.”
Get reps, then move quickly into a small-sided game to apply it. Pattern choreography builds motor memory, not tactics. You don’t lecture it—you make bodies do it.
When a Drill Has “Bombed”
A drill has failed when:
- Confusion persists after repetition
- Multiple players disengage or become frustrated
- The intended skill isn’t actually being practiced
When this happens: stop. Evaluate later. Adjust or move on now. Never force a drill just because it was on your plan.
When to Stop or Change a Drill Mid-Practice
Stop or change when:
- It clearly isn’t working
- The team’s energy doesn’t match the drill
- The learning goal isn’t happening
The best prevention is a small rotation of reliable drills—your pivot drills—that are quick to set up and teach multiple lessons.
What If Some Players Can’t Execute the Drill?
This is inevitable.
- Some players struggle: keep the drill, simplify expectations
- Most players struggle: redesign it (too complex, too many steps, too demanding)
Exposure still matters. Execution comes later.
Technique Drills: When and How Much
Technique drills should make up about 20% of what you do.
They are useful for:
- Introducing new skills
- Reinforcing correct execution
- Short, focused work before application
A practical rhythm:
- ~10 minutes of technique
- Immediate transition into a small-sided game with constraints that applies that technique
Example: shoulder charging
- Demonstrate with another adult
- Partner reps racing shoulder-to-shoulder to the ball
- Apply in a small sided game directly following, that incorporates shoulder charging opportunities AND some decision making skills
Isolation → application.
How Drill Design Changes With Age
- U6–U8: Keep it simple. Avoid complex rules. Focus on touches and early spacing.
- U9–U12: Introduce constraints carefully. Adjust quickly if they don’t work.
- U13+: Multiple constraints are possible—but simple still works.
Final Thought
You don’t need dozens of drills. You need a few reliable formats, a willingness to adjust, and the discipline to design practice around what actually happened in games.
The Play–Drill–Play model gives players repetition, creativity, and fun—and leaves you with only a few decisions to make each practice. That’s how recreational practices stay effective—even when conditions aren’t ideal.